Shrinky-Dink microfluidics: rapid generation of deep and rounded patterns†
Anthony
Grimes
a,
David N.
Breslauer
b,
Maureen
Long
a,
Jonathan
Pegan
a,
Luke P.
Lee
b and
Michelle
Khine
*a
aSchool of Engineering, University of California, Merced, USA. E-mail: mkhine@ucmerced.edu
bDepartment of Bioengineering, University of California, Berkeley, USA
First published on 20th November 2007
Abstract
We present a rapid and non-photolithographic approach to microfluidic pattern generation by leveraging the inherent shrinkage properties of biaxially oriented polystyrene thermoplastic sheets. This novel approach yields channels deep enough for mammalian cell assays, with demonstrated heights up to 80 µm. Moreover, we can consistently and easily achieve rounded channels, multi-height channels, and channels as thin as 65 µm in width. Finally, we demonstrate the utility of this simple microfabrication approach by fabricating a functional gradient generator. The whole process—from device design conception to working device—can be completed within minutes.
Introduction
To address the need to create deep and rounded microfluidic channels without expensive and dedicated tooling, we introduce a novel method of printing microfluidic channel networks onto commercially available thermoplastic ‘Shrinky-Dinks’ in a standard laser-jet printer. ‘Shrinky-Dinks’ is a children's toy onto which one can draw a picture and subsequently shrink it to a small fraction of its original size. We printed features onto this thermoplastic, and found that after heating for 3–5 min at 163 °C, printed features shrink isotropically in plane by approximately 63% from the original printed line width and length. There is an additional corresponding increase in height of the features by over 500%. We subsequently used these shrunken features as a rigid mold for soft lithography.1 The thermoplastic mold is thus analogous to the commonly-used silicon wafer, which typically requires photolithographic patterning, for microfluidic applications. Like its silicon wafer counterpart, these plastic molds can be reused numerous times. Unlike the expensive setup and laborious processing required to make the silicon wafers, this approach only requires a laser-jet printer and a toaster oven, and can be completed within minutes. Moreover, we can achieve multi-height designs within the device, which typically requires a laborious and iterative process using standard lithographic approaches.Other novel methods have been developed as lower-cost alternatives to photolithography, the ‘gold standard’ for microfabrication and microfluidic device creation. Duffy et al.2 first introduced ‘rapid prototyping of masters’ whereby they used printed transparencies to replace the expensive chrome masks traditionally utilized in photolithography. The authors demonstrated the advantages of using rapid prototyping for masks over conventional photolithography and micromachining. Despite its convenience, the method still requires the use of expensive photoresist, high-resolution printing, and contact lithography. Tan et al.3 obviated this issue by direct printing; they photocopied designs onto transparencies to fabricate microfluidic channel molds that ranged in height from 8 to 14 µm, depending on the darkness setting of the photocopy machine. Liu et al.4 developed a one-step direct-printing technique for the design and fabrication of passive micromixers in microfluidic devices, with a maximum channel height of 11 µm. Such shallow channels are adequate for many microfluidic applications but not amenable for use with large mammalian cells (>10 µm in diameter) as well as other applications, such as flowing chemotactic gradients across adherent cells in a channel with minimal shearing.5
While Lago et al.6 introduced a way to circumvent the height limitation of single-layer ink by printing up to four times using a thermal toner transfer method onto a glass substrate, the maximum height obtained with this approach was 25 µm. Vullev et al.7 demonstrated a non-lithographic fabrication approach of microfluidic devices by printing positive-relief masters with a laser-jet printer for detecting bacterial spores; the height of the channels, which is likewise dependent on the height of the ink, is limited to between 5 and 9 µm. To achieve deep channels, McDonald et al.8 introduced the use of solid object printing (SOP) to make PDMS molds in thermoplastics. However, despite their versatility, solid object printers are considerably costly ($50![[thin space (1/6-em)]](https://www.rsc.org/images/entities/char_2009.gif) 000.)
000.)
Furthermore, the majority of these methods (as well as conventional photolithography) produce rectangular cross section channels. Pneumatic valves, first introduced by Quake and co-workers,9 important for many microfluidic applications, require microfluidic channels to be rounded such that they can be completely sealed upon valve closure. Achieving rounded microfluidic channels using typical photolithographic techniques, however, is complicated and requires an extra re-flow step of the photoresist at high temperatures. Most recently, Chao et al.10 demonstrated an elegant rapid prototyping approach, coined microscale plasma templating (µPLAT), using water molds. This technique enables the creation of rounded channels that are difficult to make with photolithography, but still requires micromachined masks and plasma activation.
In this Note, we present a simple method to fabricate microfluidic channel molds that are inherently rounded. We demonstrate the ability to create molds by printing at a larger scale and then shrinking down more than 60% by leveraging the inherent property of thermoplastics.
Experimental
Microfluidic channels are first designed in AutoCad 2002 (AutoDesk, San Rafael, CA). Using a Hewlett-Packard LaserJet 2200D, designs are printed onto the polystyrene thermoplastic sheets (Shrinky Dinks, K &B Innovations, North Lake, WI) that resemble transparencies. These sheets can be fed through the printer several times for additional height and/or multi-height channels. The 80 µm channel shown in Fig. 1 was double printed using the LaserJet 2200D at 600 dpi. Printers were set to either 600 or 1200 dpi. Counter-intuitively, at 600 dpi, smoother feature edges were achieved, at the expense of channel height. The transparency setting was used for the printer. For multi-layered printing, alignment was ensured by adjusting the printer paper tray such that it tightly fit the Shrinky-Dinks. Various printers were tried, including a HP Color LaserJet 2600n and a Samsung ML-2510. The primary difference between the various printers was a slight variation in ink height.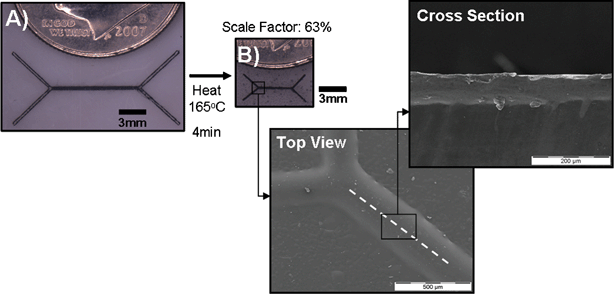 | ||
| Fig. 1 Shrinky Dinks mold generation : (A) Unshrunken Shrinky Dink master with laser printed master pattern. (B) The same master after being baked. Masters shrink from 800 to 300 µm in width. The original height of the ink (as measured on transparencies instead of unshrunk thermoplastic because the thermoplastic heats up and shrinks when prepared for the SEM) was approximately 10 µm but was difficult to measure precisely on the SEM (see Fig. 3(b)). Insets: SEM of channel top view and cross-section through a shrunken channel, illustrating a height of 80 µm. Heights varied depending on the printer used. For this 80 µm channel, we double printed with transparency mode on the Hewlett-Packard LaserJet 2200D. | ||
The printed sheet is placed in an oven for 3–5 min at 163 °C (Fig. 1). We tried both a standard toaster oven as well as a laboratory-grade oven. Whereas slight warping can result from the toaster oven, heating in the pre-heated lab oven resulted in more uniform heating. The devices were heated on a glass microscope slide for even more uniform and flat baking. We found that the slides should not be pre-heated or they will melt the plastic.
The Shrink-Dinks naturally curl while shrinking. Uniform heat on a flat surface will ensure that the Shrinkies will re-flatten after complete shrinking. A post-bake of 7 min in the oven after shrinkage greatly smooths the ink features, and helps maintain ink adhesion. We have molded devices over ten times with the same Shrinky-Dink without any noticeable deterioration in the mold.
The PDMS is poured onto the mold as in typical soft lithography, and cured at 110 °C for 10 min. The cured PDMS device is then peeled off the mold and bonded using a hand-held corona discharger.11 The whole process from device design conception to working device can be completed within minutes (Fig. 2).
 | ||
| Fig. 2 Process flow : (A) The master pattern is produced using CAD software and printed directly onto the Shrinky Dink. After baking, the pattern shrinks by 62.5%. (B) PDMS is poured over the master. (C) After curing, the PDMS is peeled off, containing a negative copy of the master pattern. (D) The molded PDMS is bonded to a glass slide to form microchannels and the finished microdevice. | ||
Results and discussion
The preformed sheets of thermoplastic, under tension, return to their original size when heated above their transition temperature. In doing so, any printed ink features are also compressed with the constricting substrate. As a feature constricts in length and width, it increases in height. This accounts for the large channel height achievable with this method. The difference in channel height between the printed ink and the constricted, shrunk ink is substantial (cf. Fig. 3(a) and (b)). Moreover, we can achieve rounded channels (Fig. 3).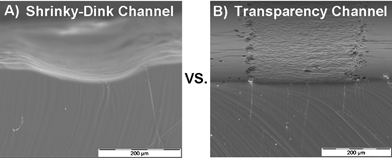 | ||
| Fig. 3 Scanning electron micrographs ( SEM ) of channels made from our approach (A) compared to those made using transparencies (B) : (A) Perspective SEM of channel made using Shrinky-Dink mold vs. (B) transparency. The difference in height and shape is apparent. | ||
We demonstrate the utility of this approach by fabricating a deep (>50 µm) gradient generator (Fig. 4(a)). We also demonstrate the ability to easily flow mammalian (Chinese Hamster Ovary, CHO) cells through such deep channels (Fig. 4(b)).
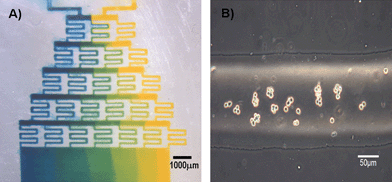 | ||
| Fig. 4 Functional devices : (A) Bonded PDMS gradient generator with food dye. (B) Bright field image of CHO cells flowing through channel. | ||
The minimum line width we were able to achieve was 65 µm (as verified by SEM, data not shown). This is a function of the printer and we believe higher resolutions are achievable with more advanced printers. Finally, we can achieve multiple feature heights by re-printing only some of the channels. This is accomplished by feeding the printed sheet back through the printer to selectively double-print certain patterns. In this way, interconnecting channels of different heights or weirs can be easily molded.
Acknowledgements
We gratefully acknowledge the National Science Foundation (NSF) Center for Integrated Nanomechanical Systems (COINS) for support of students. We would also like to also thank Mike Dunlap and the UC Merced Imaging and Microscopy Center (IMF).References
- Y. Xia and G. M. Whitesides, Annu. Rev. Mater. Sci., 1998, 28, 153–84 CrossRef CAS.
- D. Duffy, J. C. McDonald, O. J. A. Schueller and G. M. Whitesides, Anal. Chem., 1998, 70, 4974–4984 CrossRef CAS.
- A. Tan, K. Rodgers, J. P. Murrihy, C. O. Mathuna and J. D. Glennon, Lab Chip, 2001, 1, 7–9 RSC.
- A. Liu, F. He, K. Wang, T. Zhou, Y. Lu and X. Xia, Lab Chip, 2005, 5, 974–978 RSC.
- F. Lin, C. M. C. Nguyen, S. J. Wang, W. Saadi, S. P. Gross and N. L. Jeon, Biochem. Biophys. Res. Commun., 2004, 319, 576–581 CrossRef CAS.
- C. L. Lago, C. Neves, D. P. Jesus, H. D. T. Da Silva, J. G. A. Brito-Neto and J. A. F. da Silva, Electrophoresis, 2004, 25, 3825–3831 CrossRef.
- V. Vullev, J. Wan, V. Heinrich, P. Landsman, P. E. Bower, B. Xia, B. Millare and G. Jones, J. Am. Chem. Soc., 2006, 128, 16062–16072 CrossRef CAS.
- J. C. McDonald, M. L. Chabinyc, S. J. Metallo, J. R. Anderson, A. D. Stroock and G. M. Whitesides, Anal. Chem., 2002, 74, 1537–1545 CrossRef CAS.
- M. A. Unger, H. P. Chou, T. Thorsen, A. Scherer and S. R. Quake, Science, 2000, 288(5463), 113–116 CrossRef CAS.
- S. H. Chao, R. Carlson and D. Meldrum, Lab Chip, 2007, 7, 641–643 RSC.
- K. Haubert, T. Drier and D. Beebe, Lab Chip, 2006, 6, 1548–1549 RSC.
Footnote |
| † The HTML version of this article has been enhanced with colour images. |
| This journal is © The Royal Society of Chemistry 2008 |